1. Introduction DKIM:
The Email Trust Problem
Email was not originally designed with a way to verify who sent a message, making it easy for cybercriminals(without DKIM) to forge the sender’s address. This vulnerability led to widespread threats like email spoofing and phishing, which have caused financial losses and data breaches for people and companies.
To fight these threats, technologies like DomainKeys Identified Mail (DKIM) were developed. DKIM adds a digital signature to emails, allowing the recipient’s server to check two things:
- The email actually came from the domain it says it’s from.
- The email’s content remained unchanged during transit.
This technology shifts email security from a reactive approach—like filtering spam—to a proactive one, where the focus is on confirming that a message is legitimate from the start.
2. What is DKIM? Your Email’s Digital ID Card
DKIM, which stands for DomainKeys Identified Mail, is a security method that helps verify emails. It acts like a digital signature or seal on an email, proving the sender’s identity and ensuring the content remains unchanged during delivery.
Its main job is to help email servers confirm two things:
- The email is truly from the domain it claims to be from.
- The sender sent the email, and its content remains untampered.
While DKIM doesn’t stop spam on its own, it makes it much harder for spammers to fake their addresses. This helps other spam filters, like those based on a sender’s reputation, work better. By verifying both the sender’s identity and the message’s integrity, DKIM adds a critical layer of protection against fraud and message tampering.
Simple rule: DKIM = verifies sender + protects email content.
DKIM (DomainKeys Identified Mail) = a digital signature for emails.
Proves the email is really from the claimed domain.
Ensures the email hasn’t been changed in transit.
Doesn’t stop spam directly but makes faking addresses harder.
Helps spam filters and reputation systems work better.
Protects against fraud (e.g., altered invoices or fake messages).
The Problem DKIM Solves:
The Trust Issue: The internet’s original email system lacked strong identity checks in its design. It’s surprisingly easy for anyone to send an email and put almost any address they want in the “From” field. This is like being able to write any return address you want on a physical letter, even if you don’t live there.
The Scam: Spammers and scammers take advantage of this flaw. They “spoof” (or fake) the sender’s address to make their email look like it’s from a trusted source, like a bank, a well-known company, or a social media site.
The Goal of the Attack:
- Phishing: This is a common type of attack where the goal is to trick the recipient into giving up private information (like passwords, credit card numbers, or social security numbers). The fake email usually includes a link to a fake website that looks just like the real one.
- Malware: Sometimes, the fake email contains a malicious attachment that, once opened, can infect the user’s computer with a virus or other harmful software.
DKIM’s Solution:
DKIM acts as a digital seal, declaring, “The domain owner officially authorized this email.” The receiving email server can check this seal and say, “Okay, this email claiming to be from ‘bankofamerica.com’ actually has the correct signature from ‘bankofamerica.com’.”
If a spammer tries to send an email pretending to be from that same bank, their email won’t have the correct DKIM signature. The recipient’s email provider will see this mismatch and know the email is fake, often moving it to the spam folder or blocking it entirely. This is how DKIM makes it much harder for scammers to get their fraudulent emails into your inbox.
3. DKIM in Google Workspace:
For Google Workspace users, Google handles the private key management. As the administrator, you actively generate a public DKIM key in your Google Admin console and then add that public key as a TXT record to your domain’s DNS settings (at your domain registrar, such as GoDaddy or Cloudflare). Once done, Google Workspace automatically signs all outgoing emails from your domain with that DKIM signature.
What is DKIM? DKIM works by adding a cryptographic signature to your outgoing emails. Google’s servers securely keep a private key and generate this signature. When you send an email, the system attaches this digital signature to the email header.The recipient’s email server then retrieves a corresponding public key from your domain’s DNS (Domain Name System) records. The system uses this public key to verify the digital signature. If the signature is successfully verified, it confirms two things:
- The email genuinely originated from your domain.
- No one has tampered with the email content during transit.
Why is it Important?
DKIM is crucial for several reasons:
- Enhanced Email Security and Spoofing Prevention: It makes it significantly harder for unauthorized parties to send emails pretending to be from your domain, thereby combating phishing and spoofing attacks.
- Improved Sender Reputation and Deliverability: Email service providers (ESPs) like Gmail are more likely to deliver emails when you properly authenticate them. A valid DKIM signature builds trust with ESPs and reduces the chances that they will mark your legitimate emails as spam or reject them.
- Recipients Gain Increased Trust: When recipients see that an email is authenticated, it instills greater confidence in the message’s legitimacy.
- Compliance with Sender Requirements: Many email providers now have stricter guidelines for bulk senders, often requiring DKIM (along with SPF and DMARC) for better deliverability.
Limitations of DKIM:
While powerful, DKIM has some limitations:
- DNS TXT Record Character Limits: A common issue is the 255-character limit for TXT records in many DNS providers. This can be problematic for 2048-bit DKIM keys, which are more secure but longer. In such cases, the key might need to be split into multiple strings.
- Message Modification by Outbound Gateways: If an outbound email gateway modifies the email content (e.g., by adding a footer), it can invalidate the DKIM signature, causing authentication to fail.
- Forwarding Issues: Email forwarding can sometimes break DKIM authentication, as the message might be altered during the forwarding process.
- Not a Complete Solution on its Own: While effective, DKIM is best used in conjunction with other email authentication protocols like SPF (Sender Policy Framework) and DMARC (Domain-based Message Authentication, Reporting, and Conformance) for comprehensive email security and deliverability. SPF verifies the sender’s IP address, and DMARC provides policies for handling emails that fail authentication and offers reporting on email authentication results.
4. How DKIM Works: A Step-by-Step Journey
DKIM’s operation relies on a sophisticated yet elegant system known as public-key cryptography, often likened to a “secret handshake” between email servers.
The “Secret Handshake”: Public-Key Cryptography Explained
At the core of DKIM is the concept of a cryptographic key pair. Every domain implementing DKIM generates two mathematically linked keys:
- Private Key: This key is kept strictly confidential by the sending domain’s mail server. Its sole purpose is to generate the unique digital signature for outgoing emails. One can imagine this as the unique key that locks or seals the message.
- Public Key: In contrast, this key is made publicly available. It is published in the domain’s DNS (Domain Name System) records, allowing any receiving mail server worldwide to retrieve and use it to verify the digital signature. This is akin to a widely distributed key that can unlock and confirm the authenticity of the sealed message without revealing the original sealing mechanism.
An asymmetric key pair consists of a public key and a private key. The private key is a secret used for signing and must be kept secure. The public key is used for verifying and can be shared with anyone without risk. This setup is highly secure and scalable because it allows for public verification without ever revealing the secret private key.
Sending an Email: The Signing Process
When an email is dispatched from a domain configured with DKIM, the originating mail server performs a crucial step:
- Signature Generation: The server utilizes its unique private key to generate a digital signature for the email message. This signature is not arbitrary; it is a cryptographic hash derived from specific, predetermined parts of the email. These typically include certain header fields (such as “From,” “To,” “Subject,” and “Date”) and, importantly, a hash of the message body itself.
- Header Addition: Once generated, this digital signature is appended to the email as a special header field known as DKIM-Signature. This header is more than just the signature; it also contains vital metadata necessary for the verification process, including the domain claiming responsibility for the signature (d= tag), the specific selector used (s= tag), and the cryptographic algorithm employed (a= tag).
By including specific parts of an email’s content in its digital signature, DKIM can tell if anything has been changed after the email was sent. If even a small, unapproved edit is made to the email’s content or header, the signature will break. This protects against common tactics used in phishing and business email scams, where attackers try to change what’s in an email to trick you.
Receiving an Email: The Verification Process
Upon receiving an email that carries a DKIM-Signature header, the recipient’s mail server initiates the verification process:
- DNS Lookup: The receiving server first extracts two key pieces of information from the DKIM-Signature header: the signing domain (specified by the d= tag) and the selector (specified by the s= tag).3 It then performs a DNS (Domain Name System) query to retrieve the corresponding public key. A specialized DNS TXT record publishes this public key, usually at a subdomain following the pattern selector._domainkey.signingdomain.com (e.g., dkim1._domainkey.example.com).
- Signature Validation: With the public key in hand, the receiving server proceeds to perform two actions: it uses the retrieved public key to attempt to decrypt the digital signature found in the email header, and it independently recalculates the signature based on the email’s current content and headers. If the decrypted signature matches the recalculation, the email successfully passes DKIM authentication. This confirms that the claimed domain genuinely sent it (authenticity) and that the sender has not altered its content since signing (integrity).
DKIM’s reliance on DNS for public key retrieval is a strategic design choice that leverages a globally distributed and highly resilient infrastructure. This integration makes DKIM inherently scalable and robust, as it avoids the need for a new, centralized system for key distribution, which would be complex, costly, and introduce new points of failure. Instead, it benefits from the existing, optimized, and widely adopted DNS protocol, leading to efficient and reliable verification.
5. Understanding the DKIM DNS TXT Record (Example)
The domain owner publishes the public key in the DNS TXT record, making it globally accessible for verification. This record is a critical configuration element for domain owners.
| DNS Record Component | Description | Example Value |
|---|---|---|
| Host/Name | The unique identifier for the DKIM record, combining the selector and the domain. | dkim1._domainkey.example.com |
| Type | Specifies the record type, which is always TXT for DKIM public keys. | TXT |
| Value | Contains the public key and other metadata about the key. | v=DKIM1; k=rsa; p=MIGfMA0GCSqGSIb3DQEBAQUAA4GNADCBiQKBgQD… |
| v= (within Value) | DKIM Version | v=DKIM1 |
| k= (within Value) | Key Type (e.g., RSA) | k=rsa |
| p= (within Value) | The public key itself (a very long string of characters). | p=MIGfMA0GCSqGSIb3DQEBAQUAA4GNADCBiQKBgQD… |
6. Setting Up DKIM: A Practical Overview
Let’s say your Google Workspace domain is yourcompany.com.
- You (Admin): Go to your Google Workspace Admin console.
- Generate DKIM Key: Navigate to Apps > Google Workspace > Gmail > Authenticate email. You’ll select your domain (yourcompany.com) and click “Generate New Record.” Google will then provide you with two pieces of information:
- DNS Host name (TXT record name): Something like google._domainkey
- TXT record value: A long string of characters (your public key).
- Add to DNS: You then go to your domain registrar’s website (e.g., GoDaddy, Namecheap, your web host) and find your DNS management settings. You’ll create a new TXT record with:
- Host/Name: google._domainkey (or whatever Google provides)
- Value/TXT Data: The long string of characters provided by Google.
- Activate in Google Workspace: Back in your Google Admin console, you’ll click “Start Authentication.” Google will verify that you correctly published the DNS record.
- Email Sending: Now, when someone in your organization, let’s say john.doe@yourcompany.com, sends an email to recipient@example.com:
- Google’s mail servers, acting on behalf of yourcompany.com, add a DKIM signature to the email header. Google securely uses yourcompany.com’s private key to generate this signature.
- The email travels to example.com’s mail server.
- example.com’s mail server sees the DKIM signature in the email header. It then performs a DNS lookup for a TXT record associated with yourcompany.com at google._domainkey.yourcompany.com to retrieve the public key.
- The receiving server uses this public key to verify the DKIM signature on the email.
Result:
- If the signature is valid and matches the public key, the email passes DKIM authentication. This tells example.com’s server that yourcompany.com genuinely sent the email and made no changes to it. The email is more likely to land in the recipient’s inbox.
- If the signature is invalid, the email fails DKIM authentication. This signals potential spoofing or tampering, and the system might mark the email as spam or reject it.
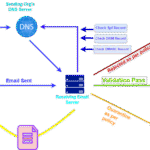
7. DKIM Work Flow Diagram

Here’s a step-by-step analysis of the DKIM flow based on the image, with notes on how Google Workspace would typically handle each step:
1: User Sends Email
- A user composes and sends an email.
- Google Workspace Context: The user sends the email through their Gmail interface or an email client configured with Google Workspace (e.g., Outlook, Apple Mail). Google’s sending mail servers then route the email.
2: Sending Mail Server Adds DKIM Signature
- The email reaches the sending mail server.
- The sending mail server takes a portion of the email (typically headers and body) and calculates a cryptographic hash.
- It then encrypts this hash using its private key. This encrypted hash is the DKIM signature.
- The email adds the DKIM signature as a header (specifically, the DKIM-Signature header).
- Google Workspace Context: When you enable DKIM in Google Workspace, Google’s mail servers (acting as the “Sending Mail Server”) automatically perform this step for outgoing mail from your domain. Google manages the private key on its end.
3: Sending Mail Server Publishes Public Key to DNS
- The sending mail server (or more accurately, the domain administrator) has a corresponding public key for the private key used in Step 2.
- The sending domain publishes this public key in a special TXT record in the Domain Name System (DNS). The image shows an arrow from the “Sending Mail Server” to “DNS” labeled “Published Public Key.”
- Google Workspace Context: When you set up DKIM in Google Workspace, Google provides you with a specific DNS TXT record that you need to add to your domain’s DNS settings. This record contains the public key that Google’s servers will use.
4: Email Sent to Receiving Mail Server
The sending mail server sends the signed email to the receiving mail server.
5: Receiving Mail Server Retrieves Public Key from DNS
- The receiving mail server receives the email with the DKIM signature.
- It extracts the domain from the DKIM-Signature header and queries the DNS for that domain to retrieve the corresponding DKIM public key (as indicated by “Retrieve Public Key” from “DNS”).
- Google Workspace Context: If a Google Workspace server is the receiving mail server, it will perform this step to verify incoming mail.
6: Receiving Mail Server Verifies DKIM Signature
- The receiving mail server uses the retrieved public key to decrypt the DKIM signature.
- It then independently calculates a hash of the same parts of the email that the sending server originally signed.
- It compares the decrypted hash (from the signature) with its newly calculated hash (“Compare Public & Private Keys” in the image refers to this comparison of decrypted signature hash with recomputed hash).
7: Outcome – Keys Match or Don’t Match
- Keys Match (DKIM Passes): If the newly calculated hash matches the decrypted hash, it shows that no one tampered with the email in transit and the claimed sender genuinely sent it.The mail server then typically delivers the email to the recipient’s inbox (“Inbox” in the image).
- Keys Didn’t Match (DKIM Fails): If the hashes do not match, it indicates that someone either altered the email after signing it or the sender is not who they claim to be (e.g., a forged email). In this case, the system often flags the email as spam or junk, or it might reject it altogether (“Spam Junk Forged” in the image).
- Google Workspace Context: Google Workspace (Gmail) implements rigorous DKIM verification for all incoming emails. If an email fails DKIM, the system increases its spam score, which can move it to the spam folder or reject it.
8. Common Reasons DKIM Fails (and How to Troubleshoot)
Despite its robust design, DKIM validation can fail due to various configuration errors or message modifications. Understanding these common pitfalls is essential for effective troubleshooting and ensuring consistent email deliverability. If DKIM validation fails, receiving servers may reject the messages or direct them to recipients’ spam folders because they do not pass authentication.
Common DKIM Validation Failures and Their Impact
| Failure Reason | Explanation | Impact | Troubleshooting Tip |
|---|---|---|---|
| Incorrect DNS TXT Record Setup | Typos in the host/name or value of the DNS TXT record, or the record is entirely missing or improperly formatted. | DKIM verification fails. Emails may be rejected, quarantined, or sent to spam. | Double-check the DNS record against your email provider’s exact instructions. Utilize online DKIM checker tools to validate the record. |
| Message Modification in Transit | An intermediary server (e.g., an outbound gateway, email security scanner, or forwarding service) alters the email after it has been signed by the sending server. Examples include adding footers, disclaimers, or changing content. | The calculated hash at the recipient’s server will not match the signed hash. DKIM fails (often indicated by “body hash did not verify” in authentication results). Emails may be rejected or marked as spam. | Configure all outbound gateways and intermediate systems not to modify emails, or ensure any necessary modifications occur before DKIM signing. |
| Truncated DKIM Key | The public key is too long for the DNS TXT record’s character limit (often 255 characters), particularly common with 2048-bit keys. | The public key is incomplete, preventing successful signature verification. | If your DNS provider supports it, split the TXT record value into multiple strings. Otherwise, consider using a 1024-bit key if it aligns with your security requirements. |
| Timing Issues (DNS Propagation) | Changes to DNS records require time (up to 72 hours) to propagate globally. Receiving servers might query an outdated DNS record before propagation is complete. | DKIM verification fails temporarily until DNS propagation is complete. | Allow 24-72 hours after publishing or updating your DKIM DNS record before expecting consistent validation. |
| Incorrect DKIM Selector | The s= tag in the DKIM-Signature header of the email does not match the selector specified in the corresponding DNS TXT record. | The receiving server cannot locate the correct public key for verification, causing DKIM validation to fail. | Ensure the selector configured on your sending mail server or ESP matches the selector used in your DNS record precisely. |
| Too Many DKIM Signatures | An email contains multiple DKIM signatures, and the authenticating signature is not among the first few checked by the receiving server (e.g., Gmail reportedly checks only the first 5 signatures). | The intended DKIM signature may not be validated, leading to a failure despite a valid signature existing elsewhere in the header. | Review your email sending chain to ensure that only necessary and primary DKIM signatures are applied, or that they are ordered correctly within the header. |
Please visit Google official site for common DKIM Issue
9. Conclusion: Securing Your Email Ecosystem
DKIM stands as a cornerstone technology for establishing trust and authenticity in email communications. It goes far beyond a simple technical setup; it plays a critical role by enabling recipients and their mail servers to verify an email’s true origin and confirm that no one has tampered with its content during transit.
The benefits of DKIM are twofold: it significantly enhances email security by actively combating spoofing and phishing attempts, and it concurrently improves email deliverability by enabling domains to cultivate a strong, verifiable sending reputation with Internet Service Providers. This dual impact underscores its importance in the modern digital landscape.
In an era where email remains a primary vector for cyberattacks, implementing DKIM, ideally in conjunction with SPF and DMARC, is no longer an optional measure but a fundamental best practice for any domain that sends email.


Pingback: DMARC: A Comprehensive Guide to Enhanced Email Security - GWS PRO
What is DKIM? An Easy Guide to Email Authentication & Security – GWS PRO
mxxbbjle http://www.g56e63abss2xb536jufb3a35902uw3u8s.org/
[url=http://www.g56e63abss2xb536jufb3a35902uw3u8s.org/]umxxbbjle[/url]
amxxbbjle
Pingback: Top 40 Powerful Google Vault Quiz Questions to Test Your Knowledge - GWS PRO