1. Introduction DMARC: Protecting Your Domain from Email Threats
Email is a prime target for cyberattacks like phishing, spoofing, and Business Email Compromise (BEC), making manual detection impossible. DMARC (Domain-based Message Authentication, Reporting, and Conformance) is a key email security protocol that verifies the sender’s identity and protects domains from unauthorized use. It allows domain owners to set authentication rules and specify actions for emails that fail checks.
For Google Workspace users, DMARC prevents attackers from sending fake emails, reduces phishing risks, improves email deliverability, and enhances brand reputation. Its detailed reports provide visibility into all email activity, helping identify unauthorized senders early. DMARC is not just a reactive filter but a proactive governance tool that builds trust and ensures legitimate communications reach recipients securely.
2. The Pillars of Email Authentication: SPF and DKIM
DMARC is not a standalone security solution; it builds upon and orchestrates two foundational email authentication technologies: Sender Policy Framework (SPF) and DomainKeys Identified Mail (DKIM). A thorough understanding of these precursor technologies is essential to fully grasp DMARC’s comprehensive capabilities.
2.1 Sender Policy Framework (SPF)
A domain owner uses SPF, an email authentication technology, to explicitly specify which IP addresses or mail servers can send email on behalf of that domain. Like a guest list, SPF dictates who can send email from a particular domain.
The operational mechanism of SPF involves several steps:
- Record Publication: Domain owners publish an SPF record, which is a DNS TXT record, containing a list of authorized sending IP addresses or mail server hostnames for their domain. For a Google Workspace user, this typically involves including Google’s SPF record. An example SPF record might appear as:
“v=spf1 include:_spf.google.com ~all”. - Recipient Server Check: When an email is received, the recipient’s email server performs an SPF check. This involves looking up the SPF record for the sender’s domain and comparing the actual IP address of the incoming email’s sending server with the list of authorized IPs in that SPF record.
- Mail From Address: This check is specifically performed against the “envelope from” address (also known as the Mail From or bounce address). This address, typically hidden from the end-user, informs mail servers where to return bounced messages if delivery fails.
- Policy Enforcement: Based on the rules defined in the sender’s SPF record (e.g., +pass, ~softfail, -fail), the receiving server determines whether to accept, reject, or flag the message.
2.2 DomainKeys Identified Mail (DKIM)
DKIM, an email authentication technology, employs cryptographic signatures to verify the authenticity of email messages and ensures that senders do not tamper with or alter their content in transit. You can conceptualize it as a tamper-proof seal that secures an email.
The process by which DKIM operates involves:
1. Key Pair Generation: The domain owner generates a unique public/private cryptographic key pair for their domain. The private key remains securely with the sending email server, while the public key is published as a DNS TXT record, making it accessible for verification.
2. Digital Signature: When an email is sent, the sending server utilizes its private key to generate a unique digital signature. This signature is an encrypted hash of selected email headers and/or the message body. This signature is then appended as a DKIM-Signature header to the email message.
3. Signature Verification: Upon receiving the email, the recipient’s email server retrieves the sender’s public key from their DNS records, as referenced in the DKIM signature header. Using this public key, it decrypts the signature and generates its own hash of the relevant parts of the received message.
4. Integrity Check: “If the newly generated hash matches the decrypted signature, it cryptographically confirms two vital aspects: the claimed domain sent the message, and no one has altered its content since signing.”
SPF verifies the sender’s server authorization based on the sending IP address, while DKIM verifies the message’s integrity and sender identity through a cryptographic digital signature. After that DMARC acts as the orchestrator, introducing the crucial concept of
3. DMARC: The Policy Enforcer and Reporter
DMARC provides the overarching policy and reporting mechanisms that build upon and integrate DKIM and SPF.Domain owners can explicitly specify how receiving mail servers should handle email messages that fail DKIM and SPF checks, particularly those that fail alignment. In essence, DMARC acts as the “judge” that decides what happens to unauthorized or misaligned emails purporting to be from a domain.
3.1 The Critical Concept of “Alignment” in DMARC
DMARC’s key feature is alignment, which ensures the domain in the visible From address matches the domain verified by SPF or DKIM.
- SPF Alignment: This requires the domain in the From: header to match the domain in the MAIL FROM (envelope sender) address.
- DKIM Alignment: This requires the domain in the From: header to match the d=domainname value found within the DKIM signature itself.
DMARC allows for specifying the strictness of this alignment through two modes
- Relaxed (r, default): This mode permits partial matches. For example, a subdomain of the From: header domain (e.g., mail.yourdomain.com) would be considered aligned with yourdomain.com. This mode is generally sufficient for most spoofing protection.
- Strict (s): This mode demands an exact match between the From: header domain and the SPF/DKIM-verified domain. Google recommends considering strict alignment in specific cases, such as when a subdomain outside direct control sends mail for a domain. However, you should note that if strict alignment is not meticulously configured, it can inadvertently cause mail servers to reject legitimate messages from associated subdomains or send them to spam.
A message successfully passes DMARC if at least one of these conditions is met:
(1) SPF authentication passes AND SPF alignment passes, OR
(2) DKIM authentication passes AND DKIM alignment passes. Conversely, a message fails DMARC if both SPF (or SPF alignment) and DKIM (or DKIM alignment) fail.
If both fail, DMARC fails. The DMARC DNS record sets the policy for how mail servers handle failed messages.
4. Anatomy of a DMARC Record: Understanding the Tags
A DMARC record is a simple text string published as a DNS TXT record. It is typically created under the hostname _dmarc.yourdomain.com (where yourdomain.com is replaced with the actual domain name). This string comprises various “tags” separated by semicolons, with each tag defining a specific aspect of the DMARC policy and reporting.
4.1 Here’s a basic DMARC record sample you can publish in your domain’s DNS (as a TXT record):
- Name/Host: _dmarc.yourdomain.com
- Type: TXT
- Value: v=DMARC1; p=reject; rua=mailto:dmarc-reports@yourdomain.com; ruf=mailto:dmarc-failures@yourdomain.com; adkim=s; aspf=s; pct=100;
Explanation of Tags(details about the each tags you can see below):
- v=DMARC1 → DMARC version (always required).
- p=reject → Policy for failed messages (
none,quarantine, orreject). - rua=mailto: → Email address for aggregate reports.
- ruf=mailto: → Email address for forensic/failure reports (optional).
- adkim=s → DKIM alignment (
s= strict,r= relaxed). - aspf=s → SPF alignment (
s= strict,r= relaxed). - pct=100 → Percentage of emails the policy applies to (0–100).
4.2 Essential Tags (Minimum Required)
v (version):
- Purpose: This tag indicates the DMARC version being used.
- Value: It must always be DMARC1, as it is the only valid DMARC version currently.
p (policy):
Purpose: This is the most crucial tag in a DMARC record. It instructs receiving mail servers what action to take with messages that fail DMARC authentication for the domain.
Values(Click here): There are three main policy settings:
p=none (Monitor Mode):
Description: This policy instructs the recipient’s email provider to take no specific action if an email fails DMARC authentication. Messages are delivered normally to the recipient’s inbox or other folders.
Why it is the Starting Point: While it offers no direct enforcement or protection, p=none is vital for gathering feedback and gaining visibility into email streams without impacting existing legitimate email flows. It allows for the identification of all legitimate email sources that might not yet be DMARC compliant before enforcing stricter policies, thereby preventing accidental blocking of valid emails.
p=quarantine (Spam Folder):
Description: This policy directs unqualified emails (those that fail DMARC authentication) to a different folder, typically the recipient’s junk or spam folder, instead of the primary inbox.
Impact: Suspicious emails are moved to spam, but recipients can still review them if needed. This serves as a safer intermediate step before implementing a reject policy, as legitimate emails mistakenly flagged can still be retrieved by the recipient.
p=reject (Block Outright):
Description: This is the strictest DMARC policy. It instructs the email provider to block any email that fails DMARC authentication outright, preventing it from reaching the recipient’s inbox at all.
Impact: Unqualified emails are blocked and never reach the recipient. This policy provides the strongest protection against spoofing. However, it is critically important to ensure every legitimate email-sending service (including third-party platforms) is properly authenticated and aligned before implementing p=reject to avoid inadvertently blocking authentic emails.
rua (Aggregate Reports URI):
Purpose: This tag specifies the email address (or URI) where DMARC aggregate reports should be sent by receiving mail servers.
Value: It must include mailto: followed by the email address, e.g., mailto:dmarc-reports@yourdomain.com. Multiple addresses can be listed, separated by commas.
Importance: Receiving and monitoring these reports is crucial for understanding the email ecosystem, identifying authentication issues, and making necessary adjustments to DMARC policy settings.
4.3 Other Important Tags (Optional but Recommended for Granular Control)
pct (Percentage Rollout):
Purpose: This tag allows for specifying the percentage of a domain’s emails that should be subject to the DMARC policy.
Value: A whole number from 1 to 100. By default, the DMARC policy applies to 100% of messages if this tag is omitted.
We highly recommend including pct during a gradual DMARC rollout, especially when you transition to quarantine or reject policies. This enables a controlled increase in enforcement.
BIMI Note: If a domain utilizes BIMI (Brand Indicators for Message Identification), its DMARC policy must have a pct value of 100 and a policy (p) of quarantine or reject.
sp (Subdomain Policy):
Purpose: This tag allows for setting a DMARC policy specifically for messages originating from subdomains of the primary domain.
Values: It accepts none, quarantine, or reject, similar to the main p tag.
Note: If this tag is omitted, subdomains will inherit the DMARC policy set for the parent domain. However, it is often advisable to implement DMARC across each individual domain separately rather than relying solely on sp, especially if the top-level domain is set to p=none, to avoid potential false positives or negatives.
adkim (DKIM Alignment Mode):
Purpose: Defines how strictly DKIM alignment is checked.
Values:
s (strict): Requires the sender domain to exactly match the d=domainname in the DKIM headers.
r (relaxed, default): Allows partial matches; any valid subdomain of the d=domain is accepted.
aspf (SPF Alignment Mode):
Purpose: Defines how strictly the system checks SPF alignment.
Values:
s (strict): Requires the Message From: header domain to exactly match the domain in the SMTP MAIL FROM command.
r (relaxed, default): Allows partial matches; any valid subdomain is accepted.
Table 1: DMARC Record Tags and Their Functions
| Tag | Description/Purpose | Common Values/Impact | Required/Optional |
|---|---|---|---|
| v | DMARC version | DMARC1 (only valid version) | Required |
| p | Policy for handling emails that fail DMARC authentication | none: Monitor (deliver normally); quarantine: Send to spam/junk; reject: Block outright | Required |
| rua | Email address for DMARC aggregate reports | mailto:reports@example.com | Optional (highly recommended) |
| pct | Percentage of messages subject to the DMARC policy | 1-100 (default 100 if omitted) | Optional (recommended for rollout) |
| sp | Policy for subdomains | none, quarantine, reject (inherits p if omitted) | Optional |
| adkim | DKIM alignment mode | s (strict): Exact match; r (relaxed): Subdomain match (default) | Optional |
| aspf | SPF alignment mode | s (strict): Exact match; r (relaxed): Subdomain match (default) | Optional |
| ruf | Email address for DMARC forensic (failure) reports | mailto:failures@example.com (not supported by Gmail due to privacy concerns) | Optional (not recommended) |
Table 2: DMARC Policy Impact Summary
| Policy | Description | Impact on Email Delivery | Recommended Use Case/Phase |
|---|---|---|---|
| p=none | No specific action taken for DMARC failures; messages delivered normally. | Emails delivered to recipient’s inbox or other folders regardless of authentication status. | Initial monitoring phase to gather data and identify legitimate senders. |
| p=quarantine | Emails failing DMARC are marked as suspicious. | Emails are typically sent to the recipient’s spam or junk folder. | Intermediate phase to gently enforce policy while allowing recovery of legitimate but non-compliant emails. |
| p=reject | Emails failing DMARC are blocked completely. | Emails are rejected by receiving servers and never reach the recipient’s inbox or spam. | Full enforcement phase for maximum protection against spoofing, after all legitimate senders are compliant. |
4.4 Gaining Insight: DMARC Reporting (RUA and RUF)
DMARC reporting gives feedback from mailbox providers to spot authentication issues and track domain misuse. It includes two types of reports: Aggregate (RUA) and Forensic (RUF).
Aggregate Reports (RUA)
RUA (DMARC Aggregate) reports give a summarized view of a domain’s email traffic, mainly used in tools or dashboards for high-level analysis.
Typically, a system formats the DMARC reports in XML and includes the following key information.
- The domain name in question.
- The date range covered by the report.
- The sending IP address(es) observed.
- Whether SPF and DKIM authentication checks passed or failed for messages.
- Whether SPF and DKIM authentication aligned with the From: domain.
- The system applied the DMARC policy (e.g., none, quarantine, reject) to the email.
- The domain associated with the DKIM or SPF record.
RUA report contain only email metadata, not message content, making them more privacy-friendly than RUF reports. They are essential for DMARC monitoring, helping identify authentication issues and detect domain misuse without revealing sensitive information.
Forensic Reports (RUF)
RUF (DMARC Failure/Forensic) reports notify domain admins about individual emails that fail SPF, DKIM, or DMARC checks and provide detailed diagnostics of the failure.
Unlike RUA reports, RUF reports can contain full email headers and even full message samples of email messages that failed authentication. This includes:
- Domain information (From:, Mail From:, DKIM d= domain).
- Message identifiers.
- IP-related information of the sender.
- Subject line, URLs, attachments, and sometimes the entire email body.
However, RUF reports come with significant limitations and privacy concerns:
- Exposure of PII: RUF reports may reveal Personally Identifiable Information (PII) to the domain owner, creating privacy and compliance risks under regulations like GDPR.
- Lack of Widespread Support: Many major mailbox providers, including Google Workspace, no longer support the
ruftag in DMARC due to privacy concerns. - Volume and DoS Risk: Each failed email triggers a RUF report, which attackers can exploit by sending large volumes of spoofed emails to cause a Denial of Service (DoS).
- High False-Positive Rate: Legitimate email forwarding can break DMARC authentication, generating excessive false RUF reports and making it harder to detect real threats.
Table 3: DMARC Report Types Comparison
| Report Type | Purpose | Key Content | Privacy Implications | Google Workspace Support |
|---|---|---|---|---|
| RUA (Aggregate Reports) | Provides summary data on email authentication results and traffic. | Domain name, date range, sending IP addresses, SPF/DKIM pass/fail status, alignment status, DMARC policy applied. No message content. | Generally privacy-friendly due to aggregated, metadata-only content. | Yes (recommended) |
| RUF (Forensic Reports) | Provides detailed diagnostic reports for individual emails that fail authentication. | Full headers, subject, URLs, attachments, sometimes full message body, domain info, IP info. | Significant risk of exposing Personally Identifiable Information (PII). | No (explicitly not supported by Gmail) |
5. Implementing DMARC for Your Google Workspace Domain: A Step-by-Step Guide
Implementing DMARC for a Google Workspace domain is a strategic, multi-step process that requires careful planning and execution. A phased approach is crucial to ensure that nothing inadvertently affects or blocks legitimate emails.
Prerequisites: Ensure that SPF and DKIM are correctly configured and active.
DMARC does not function in isolation; it relies entirely on the proper configuration and functioning of SPF and DKIM for email authentication. Therefore, it is imperative to have at least one of these enabled and correctly configured for a domain have at least one of these enabled and correctly configured for a domain.
before attempting to set up DMARC. You must wait at least 48 hours after setting up or updating SPF and DKIM records before proceeding with DMARC setup. During this waiting period, DNS changes fully propagate across the internet, and you can collect initial authentication data.
Warning: if SPF and DKIM are not properly configured and actively authenticating messages, any DMARC policy implemented, especially quarantine or reject, will likely cause significant delivery issues for legitimate emails.
5.1 Construct Your DMARC Record
A single line of text values defines the DMARC policy and forms the DMARC DNS TXT record. An example of a comprehensive DMARC record might look like this:
v=DMARC1; p=reject; rua=mailto:postmaster@example.com, mailto:dmarc@example.com; pct=100; adkim=s; aspf=s (where example.com is replaced with the actual domain)
Administrators must always list the v (DMARC version) and p (policy) tags first in the record. Other tags can follow in any order.Security experts strongly recommend setting the policy (p) to none (monitor mode) for initial deployment.
An example for initial monitoring (replace yourdomain.com with the actual domain) is: An example for initial monitoring (replace yourdomain.com with the actual domain) is: An example for initial monitoring (replace yourdomain.com with the actual domain) is: v=DMARC1; p=none; rua=mailto:dmarc-reports@yourdomain.com
5.2 Publish Your DMARC Record in DNS
The domain host (e.g., GoDaddy, Cloudflare, Namecheap, etc.) performs this crucial step, not the Google Workspace Admin console.
The process involves:
- Login to Domain Host: Sign in to the domain host’s admin panel. Use Google’s tool if you don’t know your domain registrar.
- Go to DNS Settings: You should open the DNS management section where you can add or update TXT records.
- Add TXT Record:
- Type: TXT
- Host/Name:
_dmarc(some hosts auto-append the domain name; confirm full hostname after saving) - Value: DMARC record string (e.g.,
v=DMARC1; p=none; rua=mailto:dmarc-reports@yourdomain.com) - TTL: Set to 3600 seconds (1 hour) or leave default/auto.
- Save Changes: Save the new TXT record.
- Verify Record: Use an online DMARC checker to confirm correct setup. DNS changes may take up to 48 hours to propagate.
NOTE: If an organization manages multiple domains, these steps must be repeated for each domain, as each can have its own distinct DMARC policy and reporting options.
5.3 Recommended DMARC Rollout Strategy(p=none > p=quarantine > p=reject)
Google Workspace strongly advocates for a gradual, phased rollout of DMARC policies. This methodical approach is critical to minimize the risk of inadvertently blocking legitimate emails and to ensure a smooth transition.
Monitor p=none(Phase 1)
- Duration: At least one week, or longer if email volume is very high or diverse.
- Action: Publish the DMARC record with the policy set to none. Example: v=DMARC1; p=none; rua=mailto:dmarc-reports@yourdomain.com.
- Outcome: During this phase, the system delivers messages normally, regardless of whether they pass or fail DMARC authentication. Legitimate messages are never rejected or marked as spam.
- Key Activity: The primary goal here is data gathering. Review DMARC aggregate reports daily. Identify all legitimate email sending sources (including third-party services) and ensure they are properly authenticating with SPF and DKIM. This phase is crucial for understanding the email ecosystem and identifying potential issues without affecting deliverability.
Quarantine p=quarantine(Phase 2) with pct gradually increasing
- Duration: This phase can last several weeks or even months, depending on the complexity of email flows and the issues identified.
- Action:After you confidently confirm that Phase 1 has no issues (i.e., all legitimate email authenticates correctly), update the DMARC record. Start with a small percentage of enforcement, using the pct tag. Example: v=DMARC1; p=quarantine; pct=5; rua=mailto:dmarc-reports@yourdomain.com.
- Outcome: Now, the system will send messages that fail DMARC authentication to the recipient’s spam or junk folder. If any emails are legitimate but non-compliant, the system will still deliver them to spam, allowing recipients to potentially recover them.
- Key Activity: Continue to review DMARC reports daily. As confidence grows that legitimate emails are consistently passing authentication, gradually increase the pct value (e.g., from 5% to 10%, then 25%, 50%, 75%, and finally 100%). Address any new issues identified promptly.
Reject p=reject(Phase 3) with pct=100
- Duration: Implement this phase only when there is full confidence that all legitimate email streams originating from the domain are DMARC compliant.
- Action: Update the DMARC record to the strictest policy. Example: v=DMARC1; p=reject; pct=100; rua=mailto:dmarc-reports@yourdomain.com.
- Outcome: Receiving servers outright reject messages that fail DMARC authentication, and they never deliver them to the recipient’s inbox or spam folder. This provides the strongest possible protection against email spoofing of the domain.
- Key Activity: Maintain ongoing monitoring of DMARC reports. You should prepare to address any very rare instances where legitimate sources might still fail, because p=reject immediately impacts delivery and causes non-delivery.
DMARC setup is not a one-time task. It requires:
- Correct and ongoing SPF and DKIM configuration.
- Mailboxes or groups to receive and review reports.
- Continuous identification of all third-party email senders and ensuring their compliance.
- Multi-stage rollout with regular monitoring, data analysis, and policy adjustments.
Because of these demands, larger organizations often need dedicated IT staff or DMARC management tools. The process goes far beyond adding a DNS record—it involves constant monitoring, troubleshooting, and collaboration to keep all legitimate emails secure and deliverable.
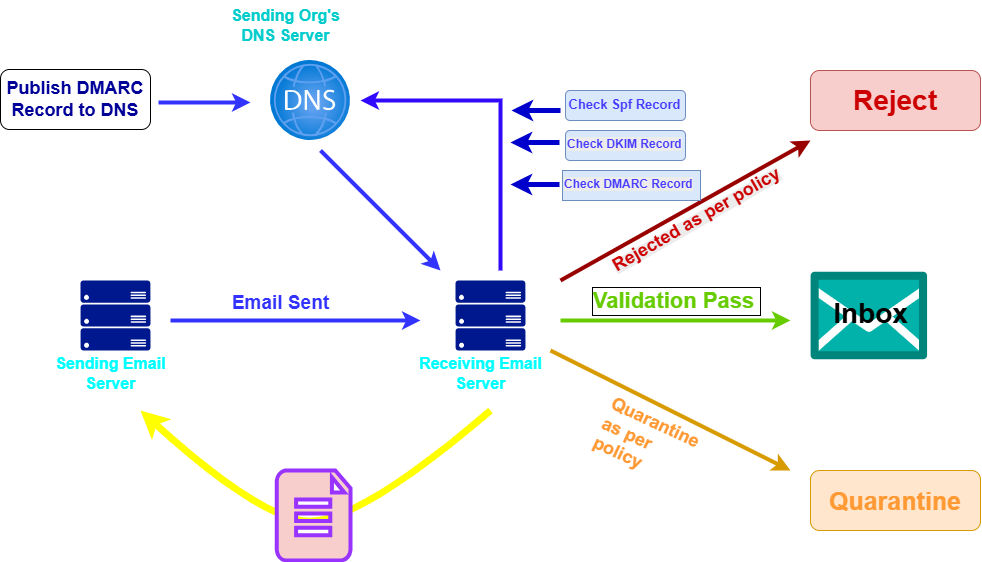
6. DMARC Flow in Google Workspace: Step-by-Step Guide
Here’s how DMARC works for emails sent from and received by Google Workspace domains, aligning with the diagram:
Part 1: The Sending Side (Setting up your Google Workspace Domain)
- Publish DMARC Record to DNS (Top Left – “Publish DMARC Record to DNS”):
- Google Workspace Action: As a Google Workspace administrator for your domain (e.g., yourcompany.com), you configure SPF and DKIM first, and then publish your DMARC record. This record is a special TXT entry in your domain’s DNS (Domain Name System).
- What it contains: This record specifies your DMARC policy (p=none, p=quarantine, or p=reject) and optionally where to send aggregate DMARC reports (rua=mailto:your-email@yourcompany.com).
- Example: For yourcompany.com, you’d add a TXT record for _dmarc.yourcompany.com with a value like “v=DMARC1; p=none; rua=mailto:dmarc-reports@yourcompany.com;”.Your domain registrar or DNS hosting provider (e.g., GoDaddy, Cloudflare) does this.
- Email Sent (Bottom Left – “Sending Email Server” to “Receiving Email Server”):
- Google Workspace Action: When a user in your Google Workspace (e.g., user@yourcompany.com) sends an email, Google’s sending email servers (acting as the “Sending Email Server” in the diagram) prepare the email.
- SPF and DKIM Application: Critically, Google’s servers automatically apply your domain’s SPF and DKIM authentication to the outbound email:
- SPF: The sending server’s IP address will be among those listed in your domain’s SPF record.
- DKIM: Your domain’s private DKIM key will digitally sign the email.
Part 2: The Receiving Side (Email Reception and Validation):
- Email Arrives at Receiving Email Server (Middle – “Receiving Email Server”):
- Action: An email sent from your Google Workspace domain arrives at the recipient’s mail server (e.g., Gmail, Outlook.com, or another corporate mail server).
- Receiving Server Queries Sending Org’s DNS Server (Right Side – “Sending Org’s DNS Server”):
- Action: The “Receiving Email Server” needs to know your domain’s authentication rules. It performs DNS lookups to your domain’s DNS server (the “Sending Org’s DNS Server” in the diagram) to retrieve your SPF, DKIM, and DMARC records.
- Check SPF Record (Top Right – “Check SPF Record”):
- Action: The receiving server checks if the ‘Sending Email Server’ (Google’s server, in this case) has permission to send email for yourcompany.com according to the SPF record it retrieved.
- Result: SPF will either “Pass” or “Fail.”
- Check DKIM Record (Top Right – “Check DKIM Record”):
- Action: The receiving server uses the public DKIM key (retrieved from your DNS) to verify the digital signature on the email. These mechanisms confirm the email’s integrity, show that no one has tampered with it, and verify that an authorized source sent it.
- Result: DKIM will either “Pass” or “Fail.”
- Check DMARC Record (Top Right – “Check DMARC Record”):
- Action: This is where DMARC ties it all together. The receiving server performs the DMARC check:
- It verifies if at least one of SPF or DKIM passed.
- Crucially, it checks for alignment: Does the “From” address (the one users see) align with the domain that passed SPF or DKIM? For Google Workspace, if SPF and DKIM pass for yourcompany.com, and the “From” address is also user@yourcompany.com, then alignment is good.
- Action: This is where DMARC ties it all together. The receiving server performs the DMARC check:
- Validation Pass (Green Arrow – “Validation Pass”):
- Scenario: If the email successfully passes the DMARC checks (meaning SPF and/or DKIM passed and there was alignment), then:
- Action: The receiving email server validates the email as legitimate.
- Result: The email is delivered to the recipient’s Inbox.
- Rejected as per policy (Red Arrow – “Rejected as per policy”) / Rejected (Red Box – “Reject”):
- Scenario: If the email fails the DMARC checks, and you set your DMARC policy (p tag) to reject:
- Action: The receiving email server outright rejects the email. The system will not deliver it to the recipient. Often, the system sends a bounce message back to the original sender of the fraudulent email.
- Result: The email never reaches the inbox or spam folder. This is the strongest protection.
- Quarantine as per policy (Orange Arrow – “Quarantine as per policy”) / Quarantine (Orange Box – “Quarantine”):
- Scenario: If the DMARC checks fail the email, and your DMARC policy (p tag) sets it to quarantine:
- Action: The receiving email server treats the email as suspicious. Typically, the system moves it to the recipient’s spam/junk folder or a dedicated quarantine area for the administrator to review.
- Result: The system delivers the email, but adds a warning or places it in a less prominent location to protect the user.
Additional Important Aspect (Not explicitly shown as a flow in the diagram, but crucial):
DMARC reporting uses the rua tag to tell receiving servers where to send daily XML reports.
These reports show which servers send emails claiming to be from your domain and their SPF/DKIM/DMARC results.
Google Workspace admins can adjust DMARC settings using this data, ensuring that they deliver real emails while blocking or quarantining spoofed ones to protect the domain’s reputation.